Here is the cutting guide for the first part of the Z-axis. The second
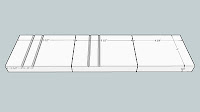
part, the router mounting bracket comes later in the process, depending on the type/size of the router and how far your Z-axis assembly ends up from the table. You will want to make all 4 of the pieces that hold the linear bearings at the same time as they are almost identical for both the Y and Z-axis assemblies (Z-axis is 1/2" longer than the Y-axis part).

I have the luxury of a table saw, which I used to make the grooves to hold the linear bearings. To make my life easier, I made a small shim, 0.90" wide that I used to get perfect spacing between the grooves. One pass with the shim, second pass without and we're all good.

I set the blade to 45 degrees, and set it to just make nice 90 degree notches. The linear slides can be left loose, but it makes assembly of the pieces a 3 or 4 handed job - a touch of epoxy held them nicely in place.

Here is how it all goes together, using the cross dowels. The open end will be "filled" later with the router mounting bracket.
 part, the router mounting bracket comes later in the process, depending on the type/size of the router and how far your Z-axis assembly ends up from the table. You will want to make all 4 of the pieces that hold the linear bearings at the same time as they are almost identical for both the Y and Z-axis assemblies (Z-axis is 1/2" longer than the Y-axis part).
 I set the blade to 45 degrees, and set it to just make nice 90 degree notches. The linear slides can be left loose, but it makes assembly of the pieces a 3 or 4 handed job - a touch of epoxy held them nicely in place.
 Here is how it all goes together, using the cross dowels. The open end will be "filled" later with the router mounting bracket.
No comments:
Post a Comment